| Zoha Zulfiqar
In today's digital world, managing data well is key.
PowerApps
attachment control helps organizations improve their
apps. It lets users upload, view, and manage documents
easily. This makes it simpler for developers and users
to keep records tidy.
Knowing how PowerApps attachment control works is vital
for developers. It boosts user experience and makes
document management easier. This guide will give you
detailed insights and useful tips. It's perfect whether
you're new to PowerApps or want to get better at it.
Key Takeaways
- Learn the fundamental functionalities of PowerApps attachment control.
- Discover the benefits of integrating attachment controls into your applications.
- Understand how to set up and effectively use attachment control features.
- Explore advanced tips for managing app attachments without forms.
- Implement best practices to ensure seamless attachment management.
Understanding PowerApps Attachment Control
PowerApps is a tool from Microsoft that lets users create custom apps without needing to code. It has a special feature called attachment control. This feature makes it easy to add and manage files in apps.
What is PowerApps Attachment Control?
The attachment control in PowerApps lets users attach and manage files in their apps. It can be added to forms, making it simple to attach documents and images. This is great for apps that need to handle lots of data and keep workflows smooth.
How Does PowerApps Attachment Control Work?
The attachment control in PowerApps works by linking with systems like SharePoint, Dynamics 365, and OneDrive. When a file is attached, it's saved in the system linked to the app. PowerApps then makes it easy to view, edit, and delete these attachments.
Benefits of Using Attachment Control in PowerApps
Using attachment control in PowerApps has many benefits:
- Improved Workflow: It lets users manage files right in the app, without switching between platforms.
- Enhanced Data Management: Keeping attachments in one place makes it easier to find and keep data consistent.
- User Interaction Simplification: It makes it easy for users to add and manage attachments, improving their experience.
- In summary, the attachment control in PowerApps is key for businesses aiming to improve their digital transformation. It boosts app functionality and data management.
In summary, the attachment control in PowerApps is key for businesses aiming to improve their digital transformation. It boosts app functionality and data management.
Setting Up and Using PowerApps Attachment Control
The PowerApps attachment control makes it easy to handle file uploads in your apps. It's key to set it up right and know how to use it. This guide will show you how to set up the PowerApps attachment control and share some useful PowerApps use cases.
Step-by-Step Guide to Setup
Setting up the PowerApps attachment control is simple. Just follow these steps to add it to your app. This will make your app better and easier to use.
- Open PowerApps Studio: Start by opening PowerApps Studio. You can open an app you already have or make a new one.
- Add a Form: Put a form control in your app. This will hold the attachment control.
- Select Data Source: Pick where the attachments will go, like SharePoint or CDS (Common Data Service).
- Insert Attachment Control: Add an attachment control to the form. You can change its settings as you like.
- Configure Properties: Set the MaxAttachments, Required, and other settings to fit your needs.
- Test and Publish: Check that the attachment control works right. Then, publish your app.
Common Use Cases for Attachment Control
The PowerApps attachment control is very useful in many situations. It makes things run smoother and makes users happier. Here are some common PowerApps use cases:
- Customer Service Forms: Let clients upload documents, images, or receipts when they make a request or complaint.
- Employee Onboarding Processes: Make HR work easier by letting new employees upload documents like IDs, resumes, and certifications.
- Document Management Systems: Make it easy to upload and manage documents in company apps. This keeps all files safe and organized.
| Use Case | Benefits |
|---|---|
| Customer Service Forms | Improves how you talk to clients, helps solve problems faster |
| Employee Onboarding | Makes it simpler to handle documents, makes HR work better |
| Document Management | Keeps important files safe and in order |
Advanced Tips for PowerApps Attachment Control
Integration
Exploring advanced PowerApps techniques is key. Understanding how to integrate attachment control, especially without forms, is crucial. This section covers three main areas: using attachment control without forms, patching attachments directly, and managing attachments effectively.
PowerApps Attachment Control Without Form
Using PowerApps attachment control without form boosts
flexibility and user experience. It lets you add
attachments directly to your data models. This
simplifies processes and cuts down on complexity.
To do this, explore custom PowerApps components or
direct API calls. This approach not only speeds up app
performance but also opens up more customization
options.
How to Patch Attachment in PowerApps Without Form
The ability to patch attachment PowerApps without form is crucial for keeping data consistent and workflows smooth. Directly patching attachments means using PowerApps functions to update your data source without forms.
- Use the Patch() function well.
- Structure your attachment data with JSON.
- Manage multiple attachments with collection objects.
By following these steps, you can make your app's structure simpler. This improves the user experience by cutting down wait times and making data entry easier.
Best Practices for Managing Application Attachments
Following best practices for attachment management ensures data is handled efficiently and securely. Here are some key practices to enhance your PowerApps application:
- Data Storage: Choose strong data storage like SharePoint or SQL Server for attachments.
- Security: Use strict access controls and encryption to safeguard sensitive data.
- Compliance: Stick to industry standards and laws to meet legal requirements.
| Practice | Benefit |
|---|---|
| Data Storage | Boosts performance and scalability |
| Security | Keeps sensitive data safe |
| Compliance | Follows legal rules |
By applying these best practices, you can make your PowerApps app more reliable and efficient. It also ensures a safe and compliant environment for handling attachments.
In Canvas Apps, an attachment control is only available inside a form. You can’t directly insert an attachment control from the insertion bar to place it anywhere in a canvas app. First you need to insert a form from insertion bar, only then you access the attachment control inside of it.
The good part is, an attachment control is found only inside a form but it doesn’t mean that it can only work inside a form. It can be used outside of a form, anywhere in your canvas app, just by copying it from a form and pasting it wherever you want to use it.
Getting it out of a form is easy but when it comes to dealing with it, it gets a little trickier. Let’s explore it with a simple demonstration to understand how it actually works.
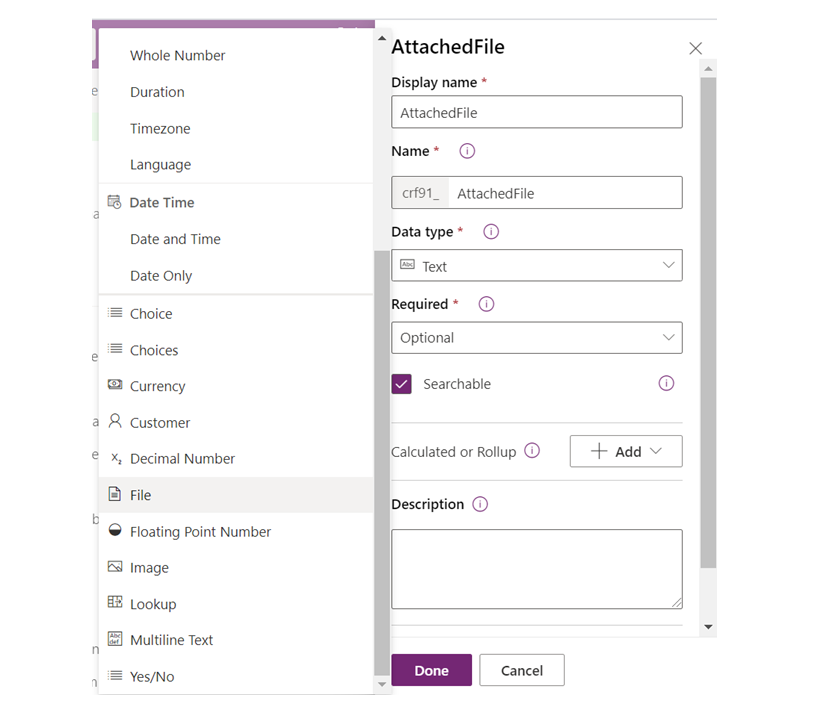
I have created a dataverse table called FileAttachments with a custom column named AttachFile. When you create a table with file type columns, make sure to check “Enable Attachments (including notes and files”).

After that, create a column inside that table with data type called File so that it can only store file attachments.
Now we are done with the table, let’s move on to the canvas app. I have created a simple canvas application to show how to use an attachment control without of a form. Let’s start by inserting a form in the canvas app and adding our FileAttachments table to it as the datasource. Only add the AttachedFile field to the form.

After that, just copy that attachment control and paste it outside the form in your canvas app and delete the form. Also, add a button for patching the attachment into dataverse and add the following code to its onSelect property.
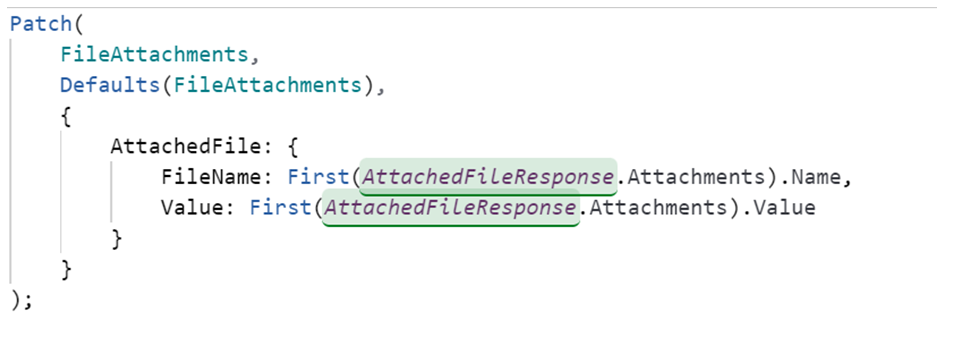
In this code, I have used a patch function to store the attachment file to the dataverse table called FileAttachments. Attachedfile is the column name and AttachedFileResponse is the name of attachment control that I have used.
Attachment control has a property where you can select the maximum amount of attachments to be stored in it. In this demonstration, I have limited it to only one attachment, so I’m using first function to access the first and only attachment file from its AttachedFileResponse. Attachments property.
Moreover, an attachment has two parameters called name and value, both are necessary to store in dataverse so the file can be stored properly.
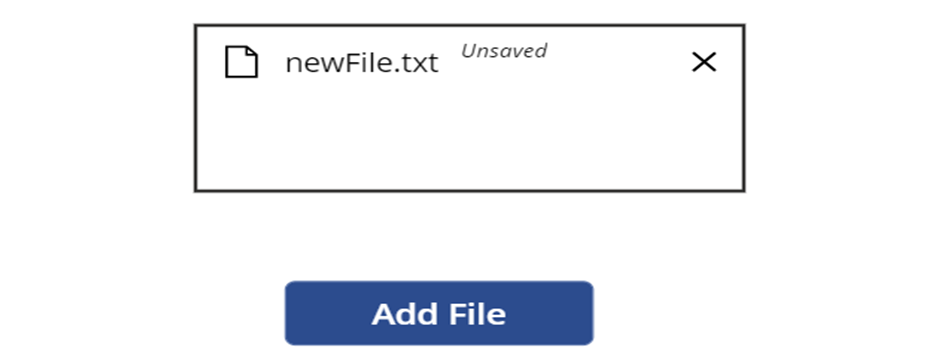
Now let’s try adding a file through the canvas app. Click on Upload file in the attachment control and select any file, click on Add File button.
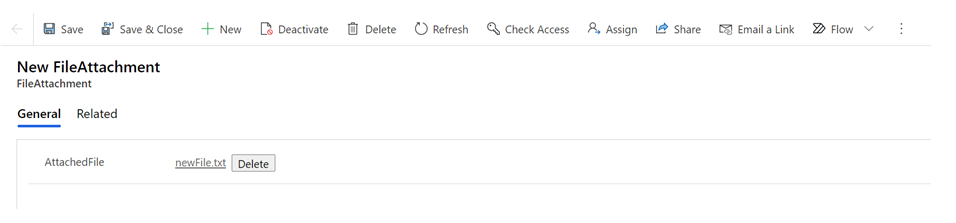
After patching, if you go back to the table and see the patched row, AttachedFile column will look like this:

If you need to see the actual file, you can create a model-driven app for it or you can just click on edit record and see that the file is properly attached.
Easy, right? Now you can easily use attachment control anywhere in your canvas app without using a form!
FAQ
What is PowerApps Attachment Control?
PowerApps Attachment Control is a feature in Microsoft PowerApps. It lets users add and manage file attachments in their apps. This makes it easier to include documents and images, improving the app's functionality and user experience.
How Does PowerApps Attachment Control Work?
It allows users to attach files directly in the app. These files are stored in data sources like SharePoint or Common Data Service (CDS). Users can upload, view, download, and delete attachments securely and efficiently.
What are the Benefits of Using Attachment Control in PowerApps?
Using Attachment Control improves workflow efficiency and data management. It also enhances user interaction and integrates files seamlessly into applications. This makes handling documents and images easier for users.
How Do I Set Up PowerApps Attachment Control?
To set it up, add the attachment control to your app and configure the data source. Make sure you have the right permissions. Follow step-by-step guides in the PowerApps documentation for a smooth setup.
What Are Common Use Cases for Attachment Control?
It's used in customer service forms, employee onboarding, document management systems, and project collaboration platforms. Attachment control makes it easy to upload and manage files in these scenarios.
Can I Use PowerApps Attachment Control Without a Form?
Yes, you can use it without a traditional form. You can add attachment controls directly to your app interface. This way, you can manage files without using forms.
How Do I Patch Attachment in PowerApps Without a Form?
To patch an attachment without a form, use specific functions to upload and save files. This can be done through PowerApps expressions and commands. It gives you more flexibility and control.
What Are the Best Practices for Managing Application Attachments?
Ensure proper data storage and maintain security and compliance. Organize files logically and use efficient data management strategies. Regularly update permissions and use PowerApps' features for better performance and security.
Join us next time, as we continue our journey of learning canvas apps.Click here to learn more about Imperium's Power Apps Services. We hope this information was useful, and we look forward to sharing more insights into the Power Platform world.