|SANA MIRZA
Custom Connectors in Power Apps are a way to extend the
capabilities of Power Apps by creating connections to
external APIs, services, or data sources. They allow you
to integrate with systems that are not natively
supported by Power Apps, enabling you to bring in data,
perform operations, and interact with external services
directly from your Power Apps environment.
Here are some things to remember about custom
connectors:
- You need to know a bit about APIs to build them (like learning the language spoken in the faraway land), but there are tools and guides to help.
- They can be public for everyone to use or private just for your team.
- They're super powerful but building them takes a bit more effort than using pre-built connectors.
So, if you want your Power Apps to be extra special and reach data outside the usual suspects, custom connectors are your secret weapon! They'll help you build even more amazing and powerful things.
In this blog, we’ll walk you through building a custom connector using an API (Application Programming Interface).
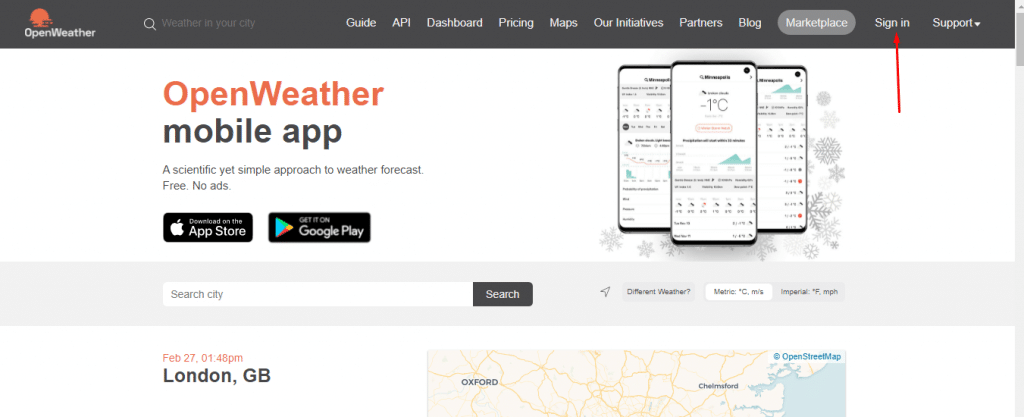
- Begin by visiting OpenWeatherMap (https://openweathermap.org/) and signing up for a free account.
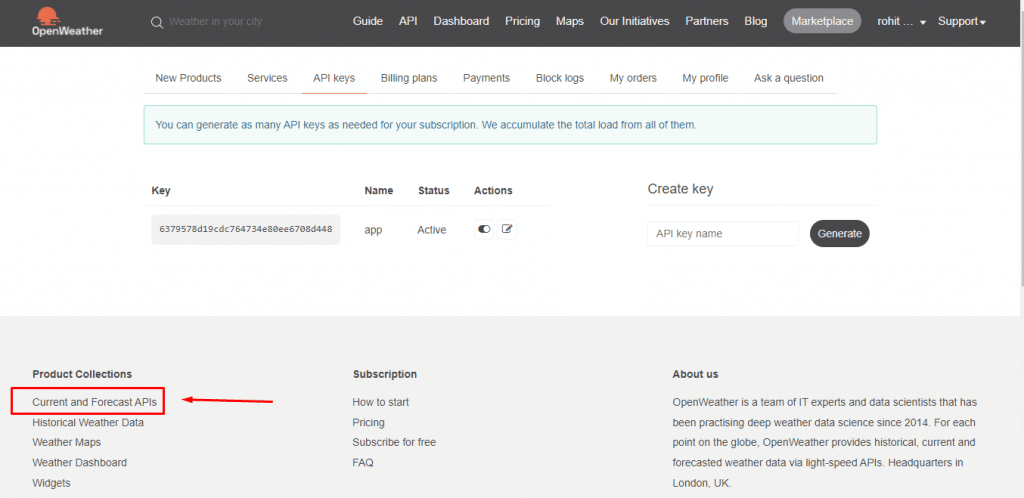
- Upon completing the registration process, you will be provided with a default API key.
-
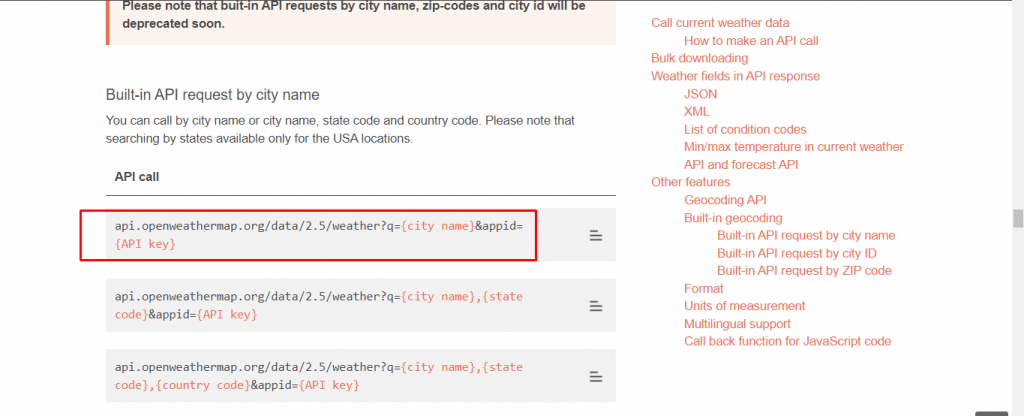
To showcase real-time weather reports by city name,
use API endpoints with the city name as a query
parameter.
Proceed to the browser and test the endpoint by providing your city name (q) and API key (app ID). -
Access Power Apps:
- Log in or sign up for Power Apps.
-
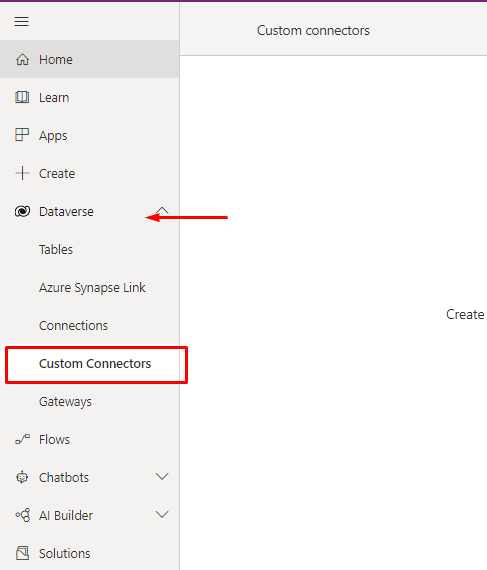
Navigate to Custom Connectors:
- Go to the "Custom Connectors" section under "Dataverse" in the left menu.
-
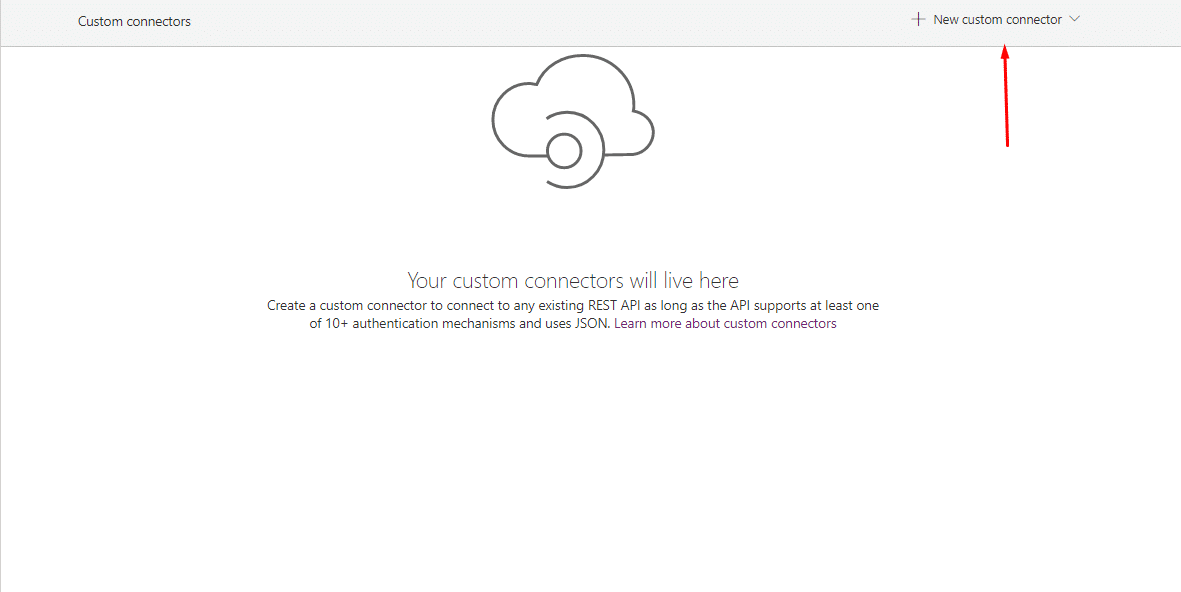
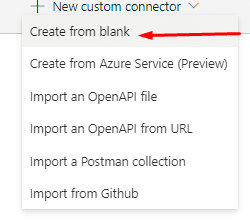
Create a New Custom Connector:
- Click on "New Custom Connector" at the top-right corner.
-
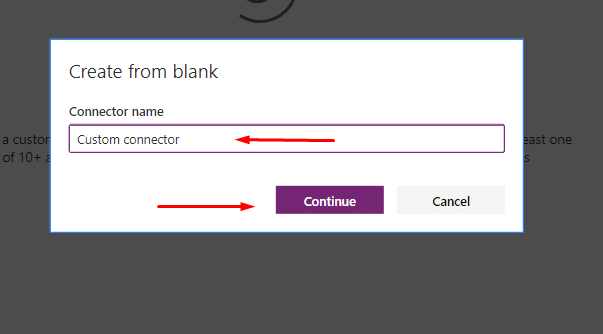
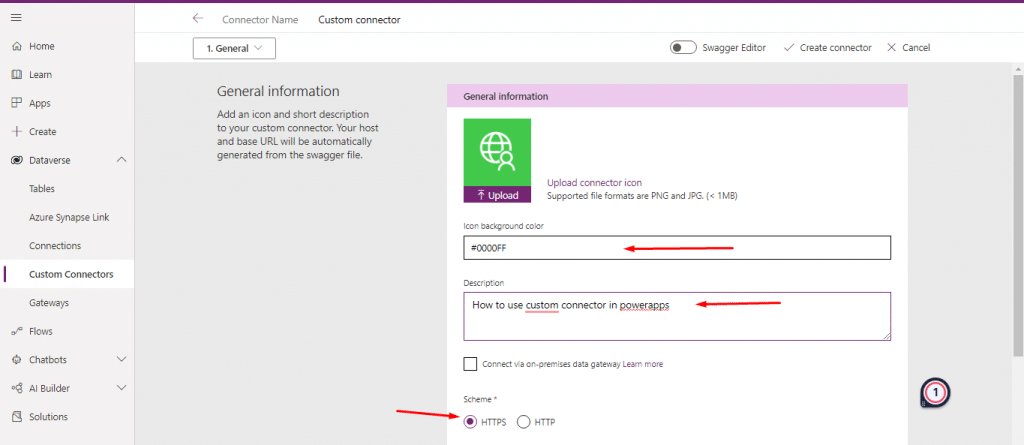
Configure Connector Details:
- Give your connector a meaningful name and customize its appearance with an icon, background color, and description.
-
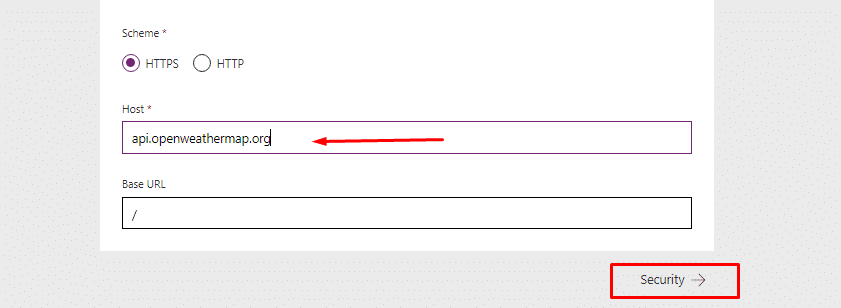
Choose HTTPS as the Scheme
- Select "HTTPS" as the scheme since the API endpoint uses HTTPS.
- Optional Customization: Optionally, tweak other settings like authentication methods, headers, or parameters based on OpenWeatherMap API requirements.
-
Save and Proceed:
- Save your custom connector configuration to move forward in the creation process.
-
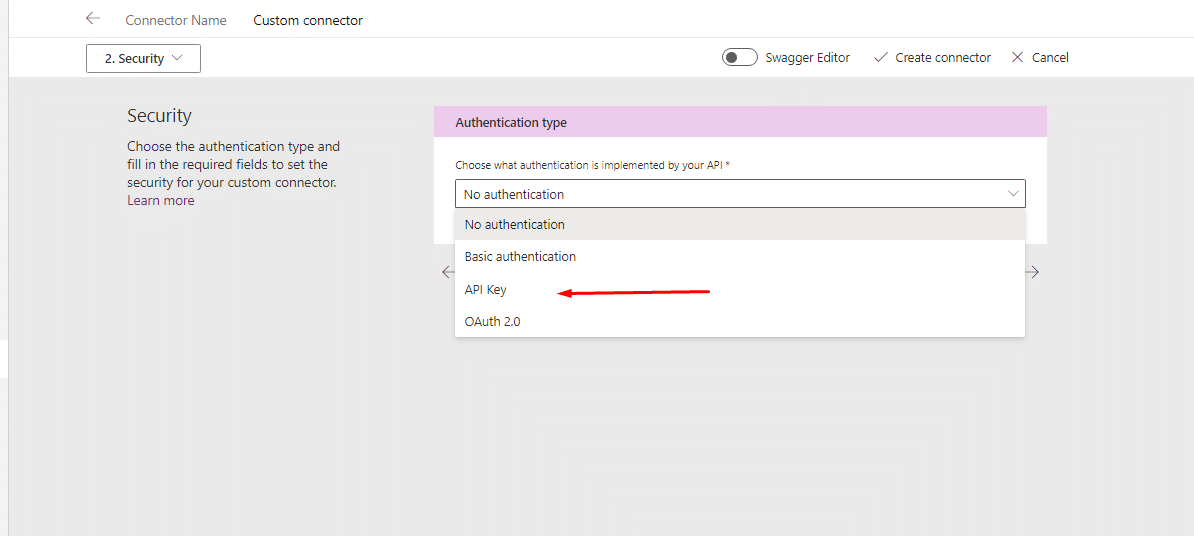
Security Configuration:
- Authentication Type: Choose "API Key" since we're using an API Key to access the endpoint.
- Parameter Label: "Key"
- Parameter Name: "authorization"
- Parameter Location: Set it to "Header".
-
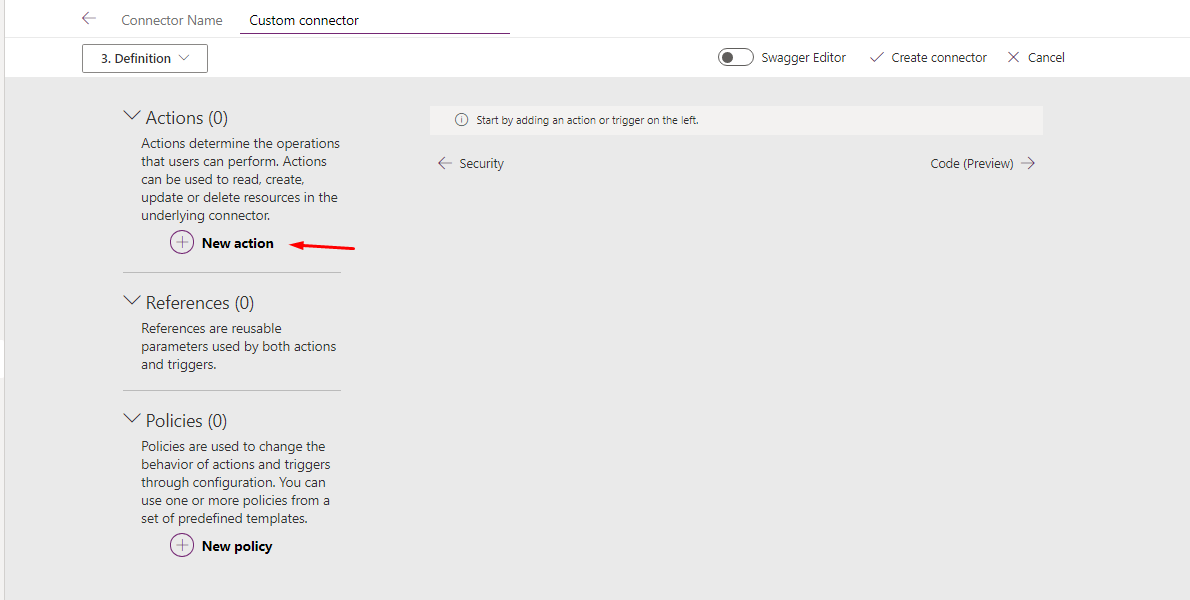
Create a New Action:
- Click on "New action" to start defining the action for your custom connector.
- General Section - Action Details: In the General section of the new action, provide a meaningful summary and description for clarity in understanding the purpose of the action.
- Operation ID Field: In the Operation ID field, assign a name that is both easy to remember and meaningful. This identifier will be crucial later when working within the canvas app.
-
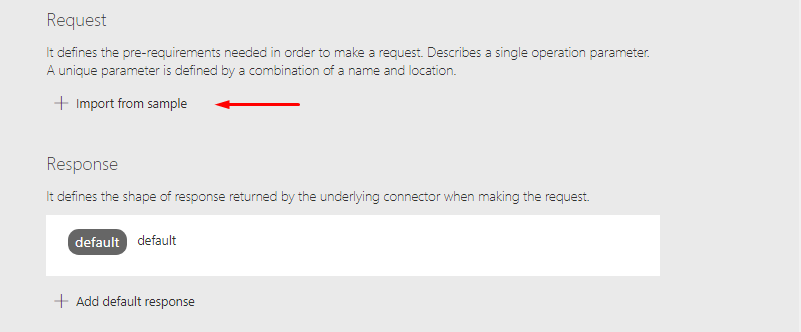
Defining Request Requirements: Identify the request
requirements for our interaction with the
OpenWeatherMap API.
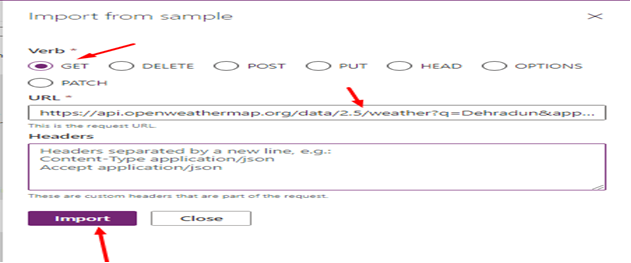
- Request Method - GET: Choose GET as the request method since we are retrieving data from the API.
-
URL Configuration:
- In the URL section, input the endpoint used earlier for testing by city name.
- Click on "Import" to confirm the endpoint configuration.
-
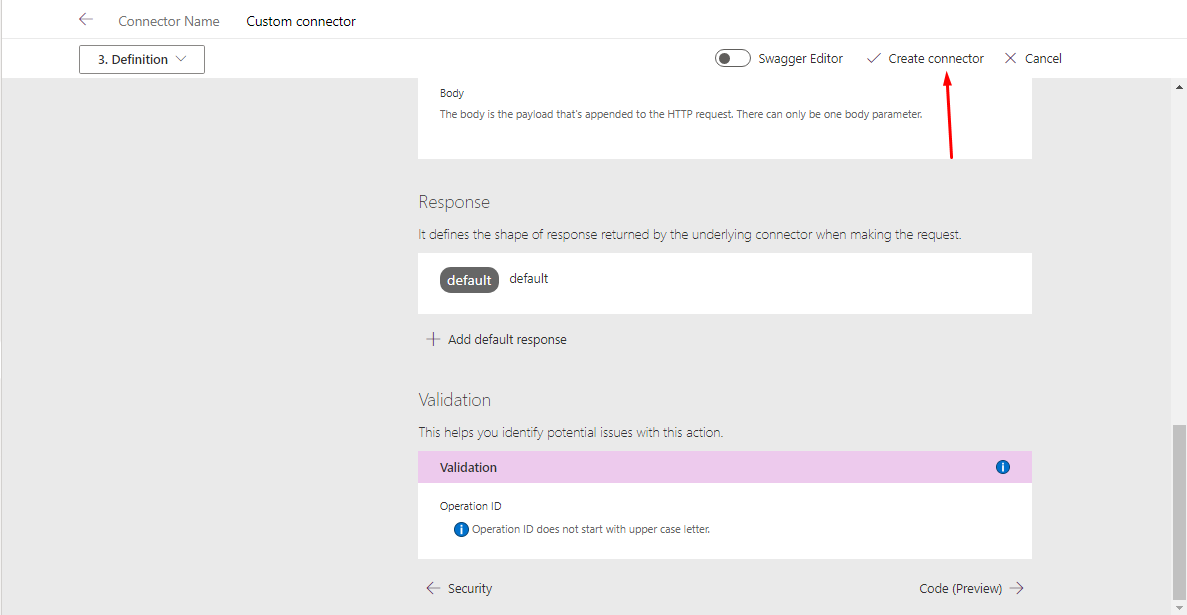
Response Section:
- Move to the Response section for specifying the expected response from the API.
- Click on "Add default response" to streamline the process.
-
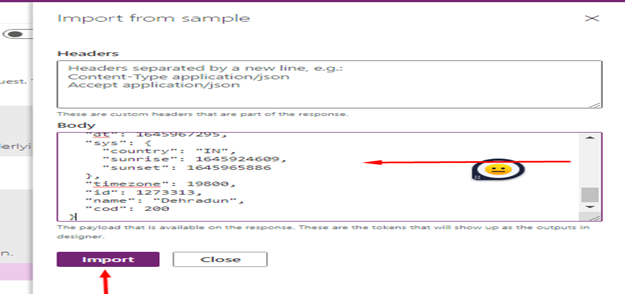
Response Body Configuration:
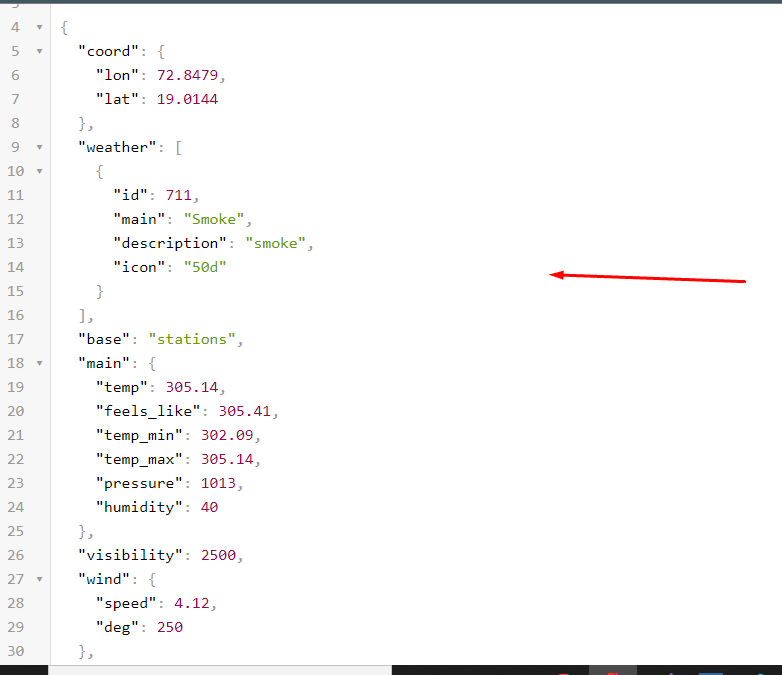
- Copy the response obtained earlier during the testing of the endpoint.
- Paste the copied response in the body section.
- Click on "Import" to confirm the response configuration.
-
Create Connector:
- Proceed to click on "Create connector" after configuring the request and response details.
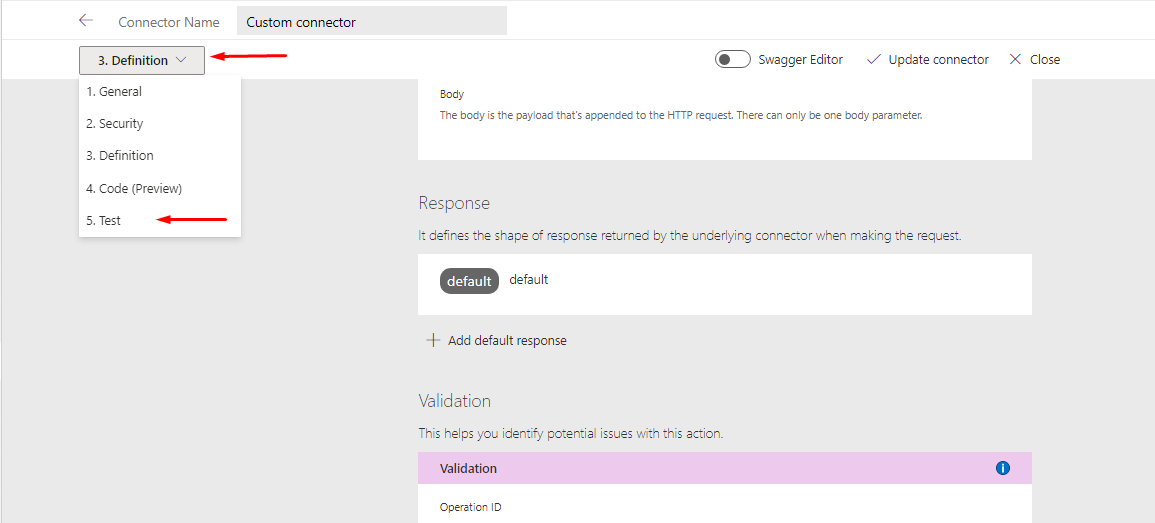
- Navigate to the dropdown list and select "Test" to initiate the testing phase for your Custom Connector.
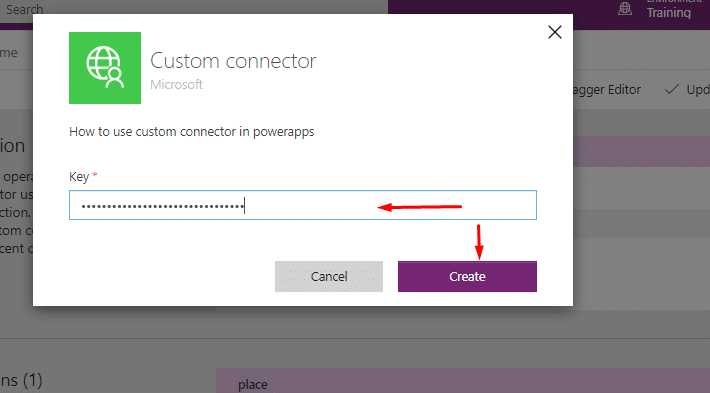
- Provide API Key: Input your API Key in the designated field.
- Click on Create: Click on "Create" to proceed with the testing process.
-
Configure Test Parameters:
- In the "Place" section, select your desired city (e.g., Mumbai) in the query parameter (q).
- Provide your App ID key in the specified field.
-
Test Operation:
- Click on "Test operation" to execute the test with the configured parameters.
-
Review the Response:
- If the request is successful, the response will include a status code of 200. The body section of the response will display the JSON response, providing real-time weather data.
-
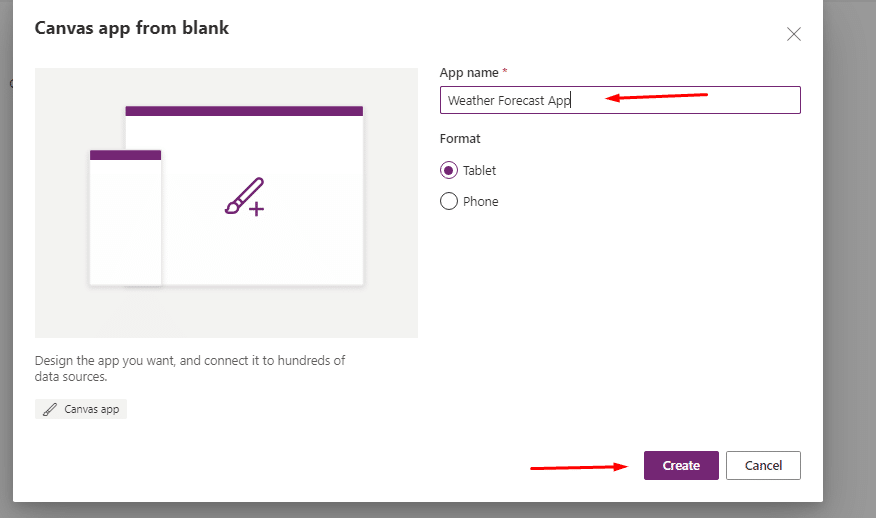
Create a New Canvas App:
Initiate the process by creating a new canvas app.
Provide a name for your app and click on "Create."
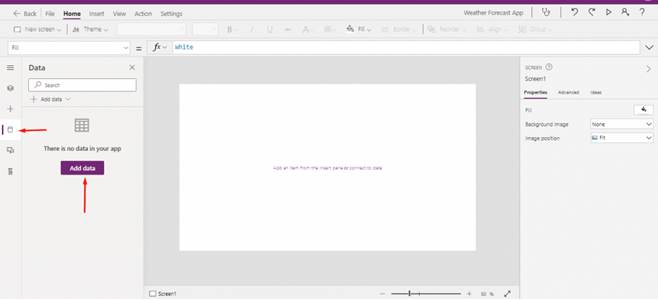
- Blank Screen Display: After creation, you'll be presented with a blank new screen.
- Access Data Icon: Click on the data icon in the menu to initiate the addition of data sources to your canvas app.
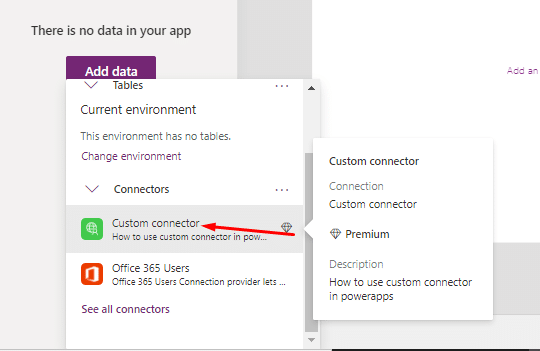
- Add Custom Connector as Data Source: Our custom connector is now available in the list of data sources. Click on the custom connector to integrate it into your canvas app.
- Label Testing: Use a label in your canvas app to test the functionality of the integrated custom connector.
- Verification: Execute the formula to observe whether the custom connector is functioning correctly within the canvas app.



In the browser, enter the URL with your city name and
API key as parameters.
Example:

A successful request will yield a JSON response. Keep this response open in the browser, as you'll need both the API key and the JSON structure for integration.


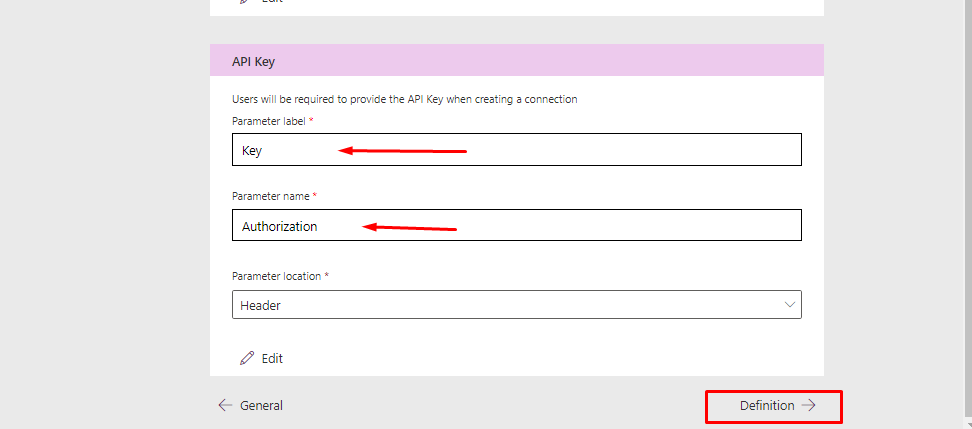
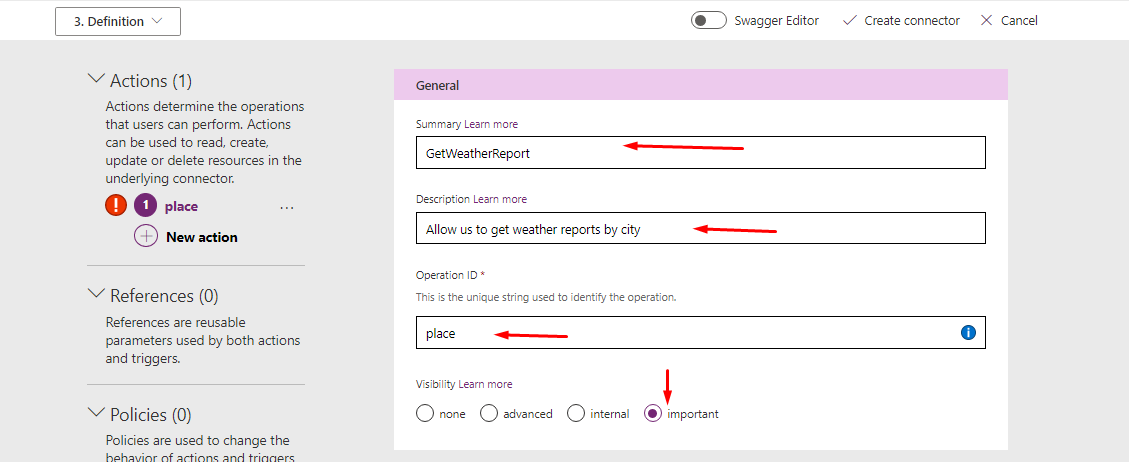
By following these steps, you have configured the security settings for API Key authentication, set up the potential for multiple actions in the Definition section, and defined the details for a specific action in the General section. These details will play a vital role in ensuring seamless integration within the canvas app and maintaining clarity in your custom connector setup.

Confirmation Message:
Upon successful creation, you'll receive a confirmation message indicating that your Custom Connector has been successfully created.

Connector Testing:
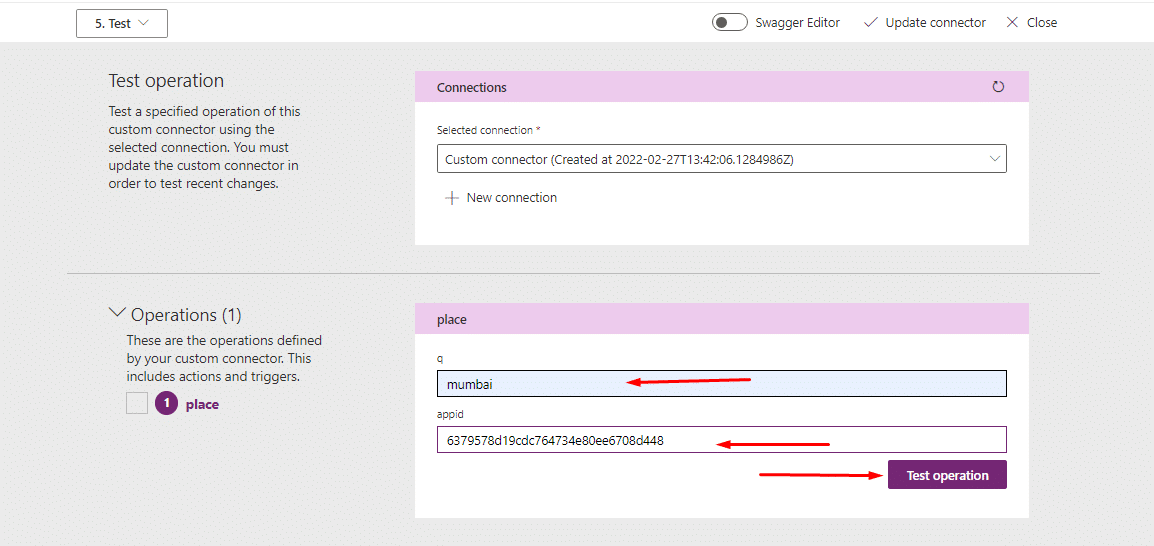
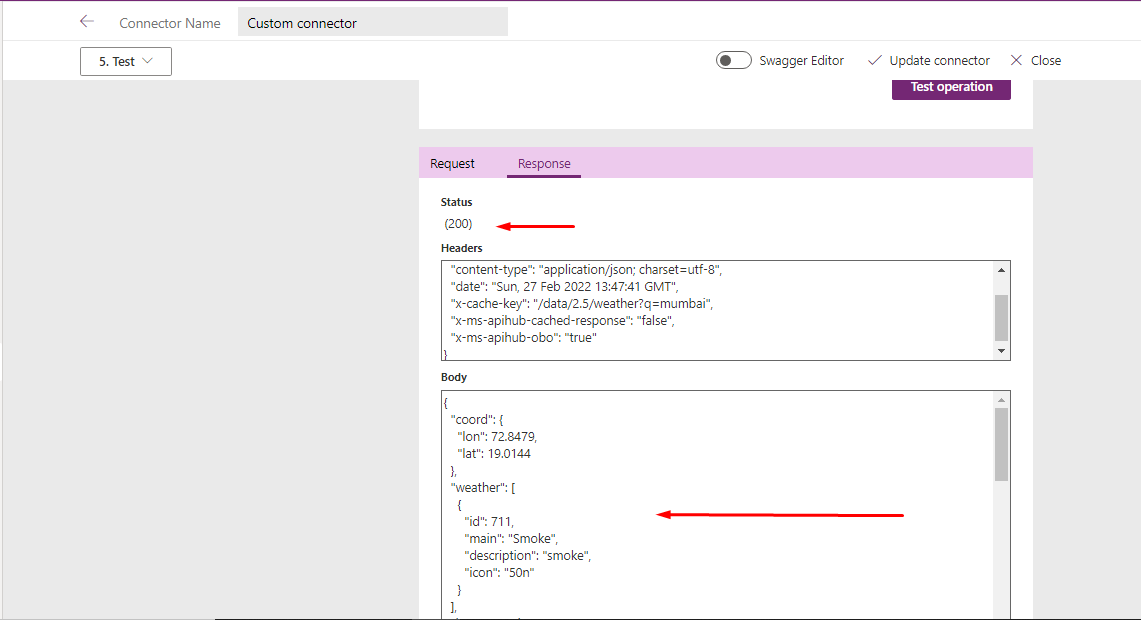
By following these steps, you've successfully initiated and completed the testing phase for your Custom Connector. The confirmation of a status code 200 and the JSON response in the body section indicates the successful integration of your connector with the OpenWeatherMap API. This validates that your Power Apps environment is now capable of fetching real-time weather data for the specified city.
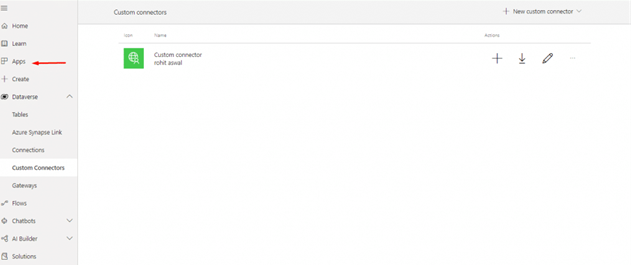
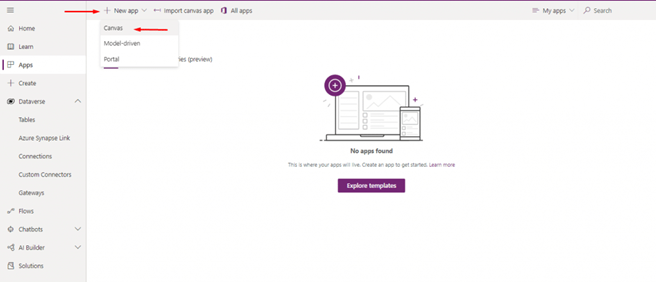
The custom connector is the connector name we have
given earlier, and the place is the operation ID.
Note: Insert your API Key in the app id section.


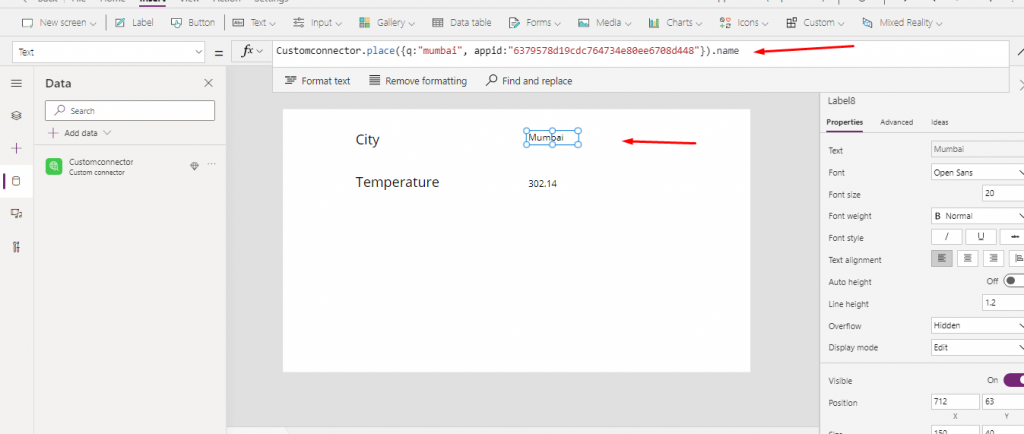
By following these steps, you have successfully added your custom connector to the canvas app as a data source and conducted a preliminary test using a label. This ensures that the integration is working as intended and lays the foundation for utilizing real-time weather data in your canvas app based on the OpenWeatherMap API.

